What is A Limiter and How to Use It?
- Tutorials
- Brenton Fisher
- August 1, 2022
Audio Limiters are extremely useful tools for any producer or mastering engineer. They are a crucial part of the mastering process and play a critical role in ensuring your music is loud enough for streaming services. But what is a limiter, how does a limiter work, and when should you use one? By the end of this article, you’ll know everything there is to know about using limiters effectively – so let’s get started.
What Is A Limiter?
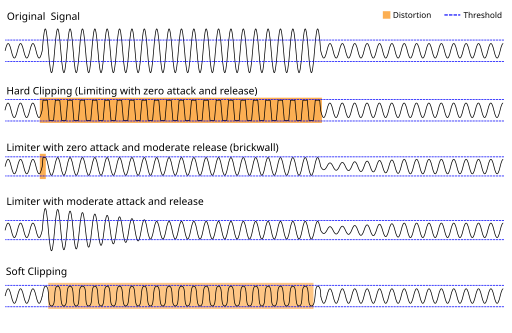
A limiter is a type of audio processing effect designed to squash any volume or ‘amplitude’ increase over a certain level. When you apply a limiter to an audio track, it monitors the incoming signal and flattens out the audio whenever it goes over the given threshold to ensure it never exceeds a certain amplitude. The purpose of this is to remove distortion in the form of clipping (which we will explain later on) and achieve greater loudness.
If you’re familiar with compressors, they work in the same way. The only difference is that limiters always have a flat ratio of ∞:1 to ensure that the volume can never exceed a specified volume.
What Does A Limiter Do?
Though limiters are a type of compressor, limiting is far easier to understand than compression, as limiters have fewer variables to think about.
Essentially, a limiter works by squashing everything over a certain volume — or ‘threshold’ — to be the same level.
For example, if you place a limiter on an audio track with a threshold of -1dBs (decibels). Every time the incoming audio signal exceeds -1dBs, the output signal will be kept at -1dBs — ‘flattened out’ as it were. Because this reduces the volume of the loudest peaks in the track, it allows the engineer to increase the overall volume of the track without introducing a generally unwanted form of distortion called clipping.
Clipping is what happens when an audio signal tries to exceed the maximum output level allowed in a piece of software or hardware. This maximum level is known as 0dB (zero decibels) and what signal volume is usually measured in relation to (e.g. -10dBs).
If an audio signal tries to exceed 0dB, the software or hardware will not be able to render the sound properly, and distortion will occur instead. It’s not always noticeable to an untrained ear, but it does make a less pleasant listening experience, and clipping is one of the biggest things that separates a professionally mastered track from an amateur one.
Clipping can also occur when a ‘square wave’ is created – when the speaker has to move instantaneously from one point to another with no transition period (which is impossible).
One of the most important functions of a limiter is to stop any clipping from occurring. It does this by working like a ‘brick wall’ that prevents any sound from ever reaching 0dB. This is why you’ll often hear the phrase ‘brick wall limiter’.
When Should You Use A Limiter?
Limiters are generally used during the mastering process to ensure that an audio track achieves a level of loudness that is consistent with other music. This means that you won’t have to keep turning the volume up and down as your playlist shifts from track to track. They also reduce the risk of ear strain, which is a phenomenon that occurs when we listen to loud music with harsh peaks throughout it for an extended period.
The best place to use a limiter is on the master bus of your DAW project — or better yet — on the final mixdown inside a mastering platform like iZotope Ozone. Limiting is usually the final stage in a mastering process, and will typically be the final form of processing applied to a finished piece of music. This is because a limiter’s main job is to stop audio peaks from exceeding 0dB, and by introducing other effects after it, you could reintroduce volume or dynamic variations that create clipping. Therefore, you should always make the limiter the last effect in your mastering chain.
However, you can also use a limiter elsewhere in the production process. For example, limiters can be useful sources of distortion or can also create intentional ‘overly-flattened’ sounds. We’ll go into this further later on.
How to Use A Limiter?
Limiters can seem quite complicated at first, but once you get your head around how they work, they are actually quite simple to use. Technically, there is no ‘right way’ to use a limiter, as it depends on the type of sound you’re going for, but there are a few key things to remember when understanding how to use a limiter for mastering:

Place your limiter on the master bus of your project and at the end of the processing chain to avoid reintroducing clipping.

Set your ‘output level’ or ‘threshold’ to something below 0dB but close to it to remove clipping. -0.1dBs usually works well.

Set your attack to something short but not zero. On most limiters, the fastest possible attack speed will work fine.

Use a professionally-mastered reference track that’s similar in style, energy, and pacing to find an appropriate level of loudness for your project, and use the ‘input level’ to push the limiter to match it.

Don’t be afraid to pull back the limiting if it’s introducing too much distortion.

Inversely, don’t be afraid to push the limiter hard if you don’t mind a super-processed, distorted sound.

Longer release times can reduce distortion, but may also mess with the overall dynamics of your project.

For best results, don’t rely solely on limiters to achieve loudness. Using limiters in conjunction with a compressor (or series of compressors) will often produce a more natural result.
Limiter Settings for Mastering
Output Level
The output level is the maximum output you want your audio to reach. This should always be below 0dBs to avoid introducing clipping. Though there is some debate about what the best output level is to master at, most engineers would agree that mastering at -0.1dBs is a reliable best practice.
Input Level
The input level increases the gain of the incoming signal and allows you to get a louder overall track (usually at the expense of some distortion). The setting you use will depend entirely on the volume you start with and the sound you want to go for, so the best thing to do is just play around until you find something that sounds right for the track. If you go too heavy, your track will sound overly processed and lack any real dynamics. However, keep it weak and it will be too quiet.
Attack
Attack is the speed at which a limiter kicks in when the incoming signal exceeds the given threshold. If the attack is too slow, the limiter won’t work properly and you’ll continue to let peaks through — introducing clipping. Set it too fast and you’ll create square waves that introduce more clipping than you started with. Luckily, most limiters won’t allow you to set the attack this fast and instead offer a maximum attack speed of something like 0.1ms. In which case, the fastest attack available will usually work best.
Release
If attack is the speed a limiter takes to kick in, release is how fast it trails off when the signal falls below the threshold. Longer releases can reduce the distortion introduced by a limiter but can also mess with the natural dynamics of the music resulting in a less natural-sounding, more obvious form of processing.
There’s no ‘right’ release setting that will work for all types of music. If you don’t mind adding a bit of distortion to your master, fast releases will work fine, but the best method is to play around with the setting until you find something that sounds best.
Other Uses for Limiters
Using Limiters for Gain Staging
Plugins and effects also have maximum output levels. If you’re not careful, you can accidentally introduce clipping to an instrument as you send it through effects during the mixing process. Applying a limiter before the effect can be a simple way to stop this from happening and rid your mixes of unwanted distortion.
Using Limiters for Distortion
Limiters can also be used to create distortion or saturation effects. Though you’ll usually find that other plugins are better designed for this purpose, you can get some really interesting effects using just a limiter pushed to its limits.
Using Limiters to Shape Dynamics
Limiters’ unique dynamic-squashing abilities also make them a great creative effect. For example, if you have an instrument with lots of variations in volume, but you want to flatten it down into a very confined channel within the mix, you can achieve great results using a limiter. Using a high input level, low output level, and long release time can work well for this type of effect.


